Micrometer
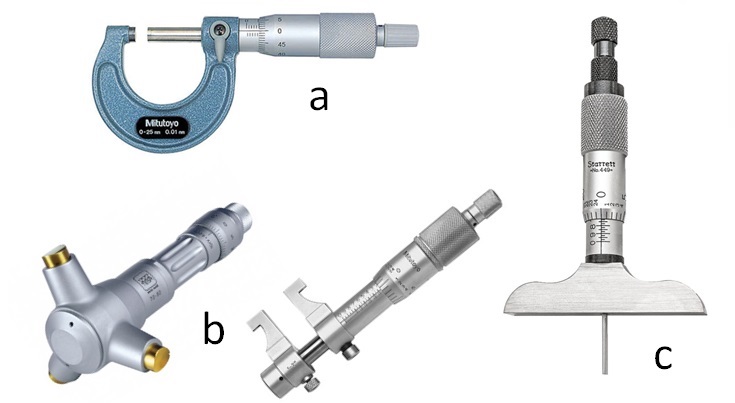
The micrometer is a precise measuring instrument for measuring small distances. The most common types are the outside, inside, and depth micrometers. For example, the outside micrometer could measure the diameter of a valve stem, the inside micrometer could measure an engine cylinder bore, and the depth micrometer is measured what is the clearance of the piston below the surface of the engine block.
Outside (a), inside (b), and depth (c) micrometers
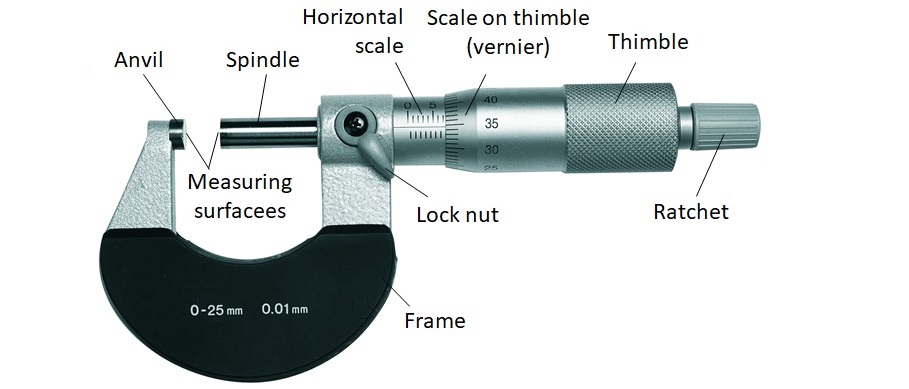
The most common type is an outside micrometer. The frame of the micrometer is in the shape of a horseshoe. Some micrometers on the frame have plastic finger pads to prevent heat transfer to the metal frame which can cause the metal to expand slightly and affect the reading. On one end of the frame is the anvil, which contacts one side of the part being measured. The second contact measuring point is the movable spindle. The micrometer measures the distance between the anvil and spindle so that it corresponds to the distance of the measuring part.
The spindle is over the inside of the sleeve in conjunction with the thimble. When the thimble rotates, the spindle moves forward/backward depending on the direction of rotation of the thimble. The measurement is read on the sleeve/barrel and thimble. The sleeve is stationary and has linear markings on it. There is a horizontal millimeter scale on the sleeve and a vernier scale on the thimble.
The thimble usually incorporates either a ratchet or a clutch mechanism, which is turned lightly by finger, thus preventing over-tightening of the micrometer thimble when taking a reading. The micrometer on the frame has a lock nut or lock screw which serves to lock the thimble in place while you read the micrometer.
The thimble is connected to the spindle via a thread. Turning the thimble moves the spindle. The micrometer has a 0.5 mm thread, which means that 1 full thimble rotation is required to move the 1 mm spindle. Each full rotation of the thimble moves the spindle by 0.5 mm, and it takes 50 rotations of the thimble to move the spindle 25 mm.
There are markings on the horizontal scale. The upper row of marks shows the distance per millimeter (1 mm), and the lower string shows half a millimeter (0.5 mm). The scale on the thimble is a vernier and has 49 marks and the value of one division is 0.01 mm.
Micrometer measuring scales
When the measuring surface is covered with a micrometer, the upper horizontal scale, which is visible up to the thimble (example B) 48 mm, is read first. Then the lower one is checked along the horizontal scale and if another lower line is seen, 0.5 mm is added, in our example, it is now 48 + 0.5 = 48.5 mm. After that, the vernier scale on the thimble is read. We take the value that coincided with the middle line on the horizontal scale, in our example it is 45. Since the vernier scale shows one-hundredth of a millimeter, then we add 0.45 mm. The final value of the distance in example B is 48 + 0.5 + 0.45 = 48.95 mm.
Inside micrometers are used to measure internal measurements. There are two types for measuring the width of the channel and for measuring the diameter of the bore.
A bore micrometer is used to measure internal diameters of 3.5 mm to 300 mm. This micrometer must be self-centering and usually contains three moving probes to provide a three-point measurement. It is used to accurately measure the diameter of the bore in the machine assembly in which the bearing or other mechanical element of a narrow tolerance field lies, such as the engine cylinder.
For measuring distances in awkward spots like the bottom of a deep cylinder, the telescoping gauge has springloaded plungers that can be unlocked with a screw on the handle so they slide out and touch the walls of the cylinder.


